1. Goals
Sketch (+code) how to organize the features and operations of ShortSquawker into an RTOS framework.
Implement on your ESP32 devboard.
-
In Lab4 you “generated an abstract representation of the ShortSquawker application by sketching its actions and requirements.”
-
Day23 and day24[1] were also about how ShortSquawker does its thing.
2. ESP32 in Arduino IDE
2.1. Setup
Add the following to the Arduino IDE’s Preferences → Additional Boards Manager URLs list:
https://raw.githubusercontent.com/espressif/arduino-esp32/gh-pages/package_esp32_index.json
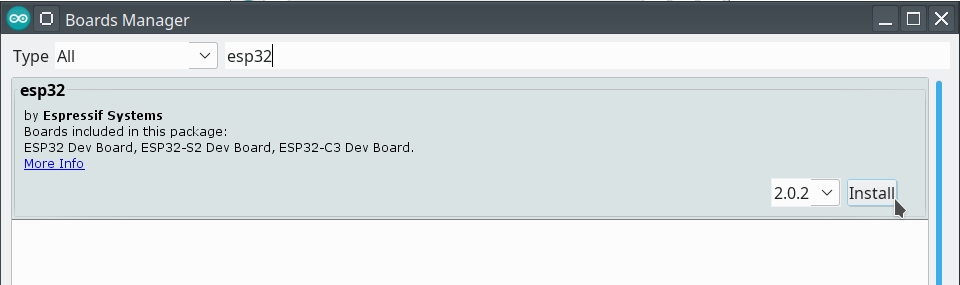
Then open Tools → Board → Boards Manager and install Espressif’s package for the ESP32.
2.2. First code
Switch the Board to ESP32 Dev Module and configure the Port to whichever COM port your board is attached to.
-
Open btn:[File} → Examples → ESP32 BLE Arduino → BLE_Beacon_Scanner
-
Compile and upload this sketch to your board.
-
Open the Serial Monitor. Be sure to set the serial baud rate to 115200.
-
You may need to reset the board with the button after uploading code.
-
You should see BLE scan results.
2.3. First FreeRTOS
-
Open btn:[File} → Examples → ESP32 → FreeRTOS
Look over this code to see how to set up two tasks.
-
The analog pin is labeled
SNon your board. -
Touch this pin while watching the Serial Monitor to see how the printed value changes.
2.4. Global variable communication
Scan the following page for the setup to this example:
lab5-hymel-03.ino/**
* FreeRTOS LED Demo
*
* One task flashes an LED at a rate specified by a value set in another task.
*
* Date: December 4, 2020
* Author: Shawn Hymel
* License: 0BSD
*/
// Needed for atoi()
#include <stdlib.h>
// Use only core 1 for demo purposes
#if CONFIG_FREERTOS_UNICORE
static const BaseType_t app_cpu = 0;
#else
static const BaseType_t app_cpu = 1;
#endif
// Settings
static const uint8_t buf_len = 20;
// Pins
static const int led_pin = LED_BUILTIN;
// Globals
static int led_delay = 500; // ms
//*****************************************************************************
// Tasks
// Task: Blink LED at rate set by global variable
void toggleLED(void *parameter) {
while (1) {
digitalWrite(led_pin, HIGH);
vTaskDelay(led_delay / portTICK_PERIOD_MS);
digitalWrite(led_pin, LOW);
vTaskDelay(led_delay / portTICK_PERIOD_MS);
}
}
// Task: Read from serial terminal
// Feel free to use Serial.readString() or Serial.parseInt(). I'm going to show
// it with atoi() in case you're doing this in a non-Arduino environment. You'd
// also need to replace Serial with your own UART code for non-Arduino.
void readSerial(void *parameters) {
char c;
char buf[buf_len];
uint8_t idx = 0;
// Clear whole buffer
memset(buf, 0, buf_len);
// Loop forever
while (1) {
// Read characters from serial
if (Serial.available() > 0) {
c = Serial.read();
// Update delay variable and reset buffer if we get a newline character
if (c == '\n') {
led_delay = atoi(buf);
Serial.print("Updated LED delay to: ");
Serial.println(led_delay);
memset(buf, 0, buf_len);
idx = 0;
} else {
// Only append if index is not over message limit
if (idx < buf_len - 1) {
buf[idx] = c;
idx++;
}
}
}
}
}
//*****************************************************************************
// Main
void setup() {
// Configure pin
pinMode(led_pin, OUTPUT);
// Configure serial and wait a second
Serial.begin(115200);
vTaskDelay(1000 / portTICK_PERIOD_MS);
Serial.println("Multi-task LED Demo");
Serial.println("Enter a number in milliseconds to change the LED delay.");
// Start blink task
xTaskCreatePinnedToCore( // Use xTaskCreate() in vanilla FreeRTOS
toggleLED, // Function to be called
"Toggle LED", // Name of task
1024, // Stack size (bytes in ESP32, words in FreeRTOS)
NULL, // Parameter to pass
1, // Task priority
NULL, // Task handle
app_cpu); // Run on one core for demo purposes (ESP32 only)
// Start serial read task
xTaskCreatePinnedToCore( // Use xTaskCreate() in vanilla FreeRTOS
readSerial, // Function to be called
"Read Serial", // Name of task
1024, // Stack size (bytes in ESP32, words in FreeRTOS)
NULL, // Parameter to pass
1, // Task priority (must be same to prevent lockup)
NULL, // Task handle
app_cpu); // Run on one core for demo purposes (ESP32 only)
// Delete "setup and loop" task
vTaskDelete(NULL);
}
void loop() {
// Execution should never get here
}Your devboard doesn’t have a LED_BUILTIN, the LED on the board is attached the the ESP32’s UART TX line.
-
Delete the
// Pinsdeclaration. You will also need to remove the related pin setup code. -
Modify the code to replace the
digitalWrite()LED pin actions withSerial.printstatements as following:
void toggleLED(void *parameter) {
  while(1) {
    // ...
    digitalWrite(led_pin, HIGH);

    // replace digitalWrite with:
    Serial.println("^");  // or "v" or something you'd like
}-
Change the
toggleLEDtask’s priority to 1 greater than thereadSerialtask’s priority.
2.5. Queue communication
lab5-hymel-05.ino/**
* Solution to 05 - Queue Challenge
*
* One task performs basic echo on Serial. If it sees "delay" followed by a
* number, it sends the number (in a queue) to the second task. If it receives
* a message in a second queue, it prints it to the console. The second task
* blinks an LED. When it gets a message from the first queue (number), it
* updates the blink delay to that number. Whenever the LED blinks 100 times,
* the second task sends a message to the first task to be printed.
*
* Date: January 18, 2021
* Author: Shawn Hymel
* License: 0BSD
*/
// Use only core 1 for demo purposes
#if CONFIG_FREERTOS_UNICORE
static const BaseType_t app_cpu = 0;
#else
static const BaseType_t app_cpu = 1;
#endif
// Settings
static const uint8_t buf_len = 255; // Size of buffer to look for command
static const char command[] = "delay "; // Note the space!
static const int delay_queue_len = 5; // Size of delay_queue
static const int msg_queue_len = 5; // Size of msg_queue
static const uint8_t blink_max = 100; // Num times to blink before message
// Pins (change this if your Arduino board does not have LED_BUILTIN defined)
static const int led_pin = LED_BUILTIN;
// Message struct: used to wrap strings (not necessary, but it's useful to see
// how to use structs here)
typedef struct Message {
char body[20];
int count;
} Message;
// Globals
static QueueHandle_t delay_queue;
static QueueHandle_t msg_queue;
//*****************************************************************************
// Tasks
// Task: command line interface (CLI)
void doCLI(void *parameters) {
Message rcv_msg;
char c;
char buf[buf_len];
uint8_t idx = 0;
uint8_t cmd_len = strlen(command);
int led_delay;
// Clear whole buffer
memset(buf, 0, buf_len);
// Loop forever
while (1) {
// See if there's a message in the queue (do not block)
if (xQueueReceive(msg_queue, (void *)&rcv_msg, 0) == pdTRUE) {
Serial.print(rcv_msg.body);
Serial.println(rcv_msg.count);
}
// Read characters from serial
if (Serial.available() > 0) {
c = Serial.read();
// Store received character to buffer if not over buffer limit
if (idx < buf_len - 1) {
buf[idx] = c;
idx++;
}
// Print newline and check input on 'enter'
if ((c == '\n') || (c == '\r')) {
// Print newline to terminal
Serial.print("\r\n");
// Check if the first 6 characters are "delay "
if (memcmp(buf, command, cmd_len) == 0) {
// Convert last part to positive integer (negative int crashes)
char* tail = buf + cmd_len;
led_delay = atoi(tail);
led_delay = abs(led_delay);
// Send integer to other task via queue
if (xQueueSend(delay_queue, (void *)&led_delay, 10) != pdTRUE) {
Serial.println("ERROR: Could not put item on delay queue.");
}
}
// Reset receive buffer and index counter
memset(buf, 0, buf_len);
idx = 0;
// Otherwise, echo character back to serial terminal
} else {
Serial.print(c);
}
}
}
}
// Task: flash LED based on delay provided, notify other task every 100 blinks
void blinkLED(void *parameters) {
Message msg;
int led_delay = 500;
uint8_t counter = 0;
// Set up pin
pinMode(LED_BUILTIN, OUTPUT);
// Loop forever
while (1) {
// See if there's a message in the queue (do not block)
if (xQueueReceive(delay_queue, (void *)&led_delay, 0) == pdTRUE) {
// Best practice: use only one task to manage serial comms
strcpy(msg.body, "Message received ");
msg.count = 1;
xQueueSend(msg_queue, (void *)&msg, 10);
}
// Blink
digitalWrite(led_pin, HIGH);
vTaskDelay(led_delay / portTICK_PERIOD_MS);
digitalWrite(led_pin, LOW);
vTaskDelay(led_delay / portTICK_PERIOD_MS);
// If we've blinked 100 times, send a message to the other task
counter++;
if (counter >= blink_max) {
// Construct message and send
strcpy(msg.body, "Blinked: ");
msg.count = counter;
xQueueSend(msg_queue, (void *)&msg, 10);
// Reset counter
counter = 0;
}
}
}
//*****************************************************************************
// Main (runs as its own task with priority 1 on core 1)
void setup() {
// Configure Serial
Serial.begin(115200);
// Wait a moment to start (so we don't miss Serial output)
vTaskDelay(1000 / portTICK_PERIOD_MS);
Serial.println();
Serial.println("---FreeRTOS Queue Solution---");
Serial.println("Enter the command 'delay xxx' where xxx is your desired ");
Serial.println("LED blink delay time in milliseconds");
// Create queues
delay_queue = xQueueCreate(delay_queue_len, sizeof(int));
msg_queue = xQueueCreate(msg_queue_len, sizeof(Message));
// Start CLI task
xTaskCreatePinnedToCore(doCLI,
"CLI",
1024,
NULL,
1,
NULL,
app_cpu);
// Start blink task
xTaskCreatePinnedToCore(blinkLED,
"Blink LED",
1024,
NULL,
1,
NULL,
app_cpu);
// Delete "setup and loop" task
vTaskDelete(NULL);
}
void loop() {
// Execution should never get here
}-
Modify this code in the same way as the last to remove the use of the LED.
-
Remember to increase the priority of the
blinkLEDtask.
2.6. Semaphore / Mutex to synchronize tasks
The article gives a good setup, stub solution, then an example solution.
-
Modify to use only
Serial.printstatements since you don’t have the LED.-
You could use another GPIO pin and monitor it with an oscilloscope instead!
-
The article has several solutions, so read the discussion before blindly copy-pasting code!
3. ShortSquawker task architecture
-
Notice how task priorities work in the examples.
-
Consider how an interrupt ISR would communicate with a Task. (there are functions with suffix
…fromISR()for this). -
Map out a set of tasks that implement the ShortSquawker main features.
-
Each task should print something short to give some feedback on its execution status.
-
4. FreeRTOS notes
These have moved to: RTOS page → FreeRTOS notes