1. Goals
-
Introductions and get to know everyone.
-
Begin understanding your robot’s features and capabilities.
2. Objectives
By the end of today, our objectives are to:
-
setup the lab computers properly
-
assemble a robot chassis kit
-
install MicroPython onto your robot
-
use the onboard MicroPython REPL to drive the motors
-
"does the hardware work?" tests
-
write a script that runs on powerup to do some pre-configured motions
Team comments:
The COEguest login has access to a network drive (S:) that we will use to store and share code and files.
-
Go into the
Roboticsfolder, then -
Create a folder for your name
THENAMEto hold your custom code and files.
3. Tasks
3.1. Setup the lab computers
-
Login to PC
-
name+password on whiteboard
-
-
GOTO: Computer setup
3.2. Upgrade MicroPython on your Pi Pico
-
Use a USB-micro cable to connect the Pi Pico to your PC.
-
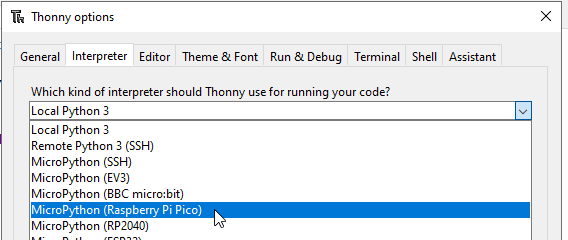
Open Thonny. Click the lower-right menu. Select “Configure interpreter…”

-
Interpreter tab → Select “MicroPython (Raspberry Pi Pico)”
-
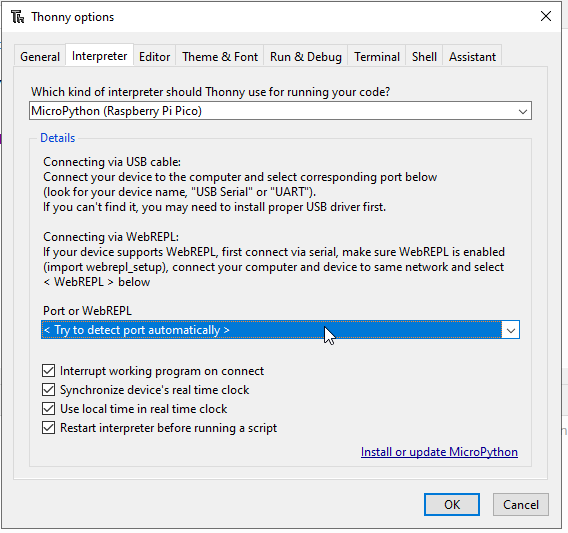
Port or WebREPL. Ensure that “< Try to detect port automatically >” is selected
-
Click on the lower-right link “Install or update MicroPython”
-
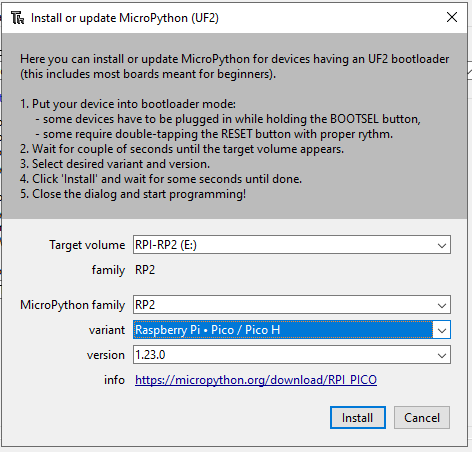
Follow the instructions to start the bootloader on the Pico:
-
Unplug the USB port
-
Hold down the tiny white
BOOTSELbutton -
Plug the USB port back in
-
Continue holding until the computer recognizes the new thing
-
-
Select the following options for family and variant, then click Install
-
Close, then OK to exit the options dialog box.
4. Run some example code
4.1. Test the 8 RGB LEDs
-
The
npobject gives access to all 8 lights on the car. The MCU talks to all these devices using only a single pin (GPIO16) and loads all of the color-brightness values at once when you callnp.write(). -
You access each light individually by using an index:
np[0]is the name of the first one,
np[7]is the last one in the chain. -
The value you assign to each pixel is a 3-element tuple of ("red", "green", "blue"). Hence they are called "RGB".
-
Each value can be any integer in the range 0 … 255, where 0 is off and 255 is maximum brightness.
rgb_test.py — Test code for the RGB lights 1
2
3
4
5
6
7
8
9
10
11
12
13
14
15
16
17
18
19
20
21
22
23
24
25
26
27
28
29
30
31
32
33
34
35
36
37
38
39
40
41
42
43
44
45
46
47
48
49
50
51
52
53
54
55
56
# python system modules
import time
# MicroPython modules
from machine import Pin
# Extra modules
from neopixel import NeoPixel
# Find the pin used to talk with the WS2812 and change "REPLACE"
pin_rgb = Pin(REPLACE, Pin.OUT)
# Configure the RGB driver with the information about the hardware wiring
# /---------- which pin to send commands out of
# | /--- how many devices are in this chain
np = NeoPixel(pin_rgb, 8)
# turn on the second RGB to purple
np[1] = (150, 150, 0) # set the color
np.write() # make it so
# camp out here for N seconds so a human can see the change
time.sleep(5)
# set all of the RGBs to the same color
for index in range(8):
print(index)
np[index] = (50, 50, 50)
# nothing changes until we write the changes
np.write()
# time to contemplate what just happened
time.sleep(10)
# The NeoPixel driver makes sending the same color to everything a little
# easier with a special command .fill()
# make it easier to read by giving specific numbers NAMES
red100 = (100, 0, 0)
green100 = (0, 100, 0)
blue100 = (0, 0, 100)
# set everything to this color
np.fill(blue100)
# don't forget to make it so
np.write()
- How can you get more information about the
NeoPixeldriver? -
Go to the documentation!
https://docs.micropython.org/en/latest/library/neopixel.html
4.2. Motor control using a Python class object
motors.pyfrom machine import Pin
from machine import PWM
from machine import Timer
def duty_to_u16(x):
"""Convert a percentage 0..100 into the range used by the PWM hardware of
0..65535. (2**16 - 1), the largest unsigned 16-bit number.
The sign of _x_ is ignored and treated as always positive."""
x = abs(x) # ensure this is a positive number
out = (65535 * x) // 100
return out
class motor:
"""Class that describes how to control _some_ motor, since they all work
the same way. When creating a specific instance of the motor drive, it
needs to be told which two pins it has control over, labeled _a_ and _b_
here."""
#
# Initialization
#
def __init__(self, pin_a, pin_b, freq=1_000):
self.pin_a = pin_a
self.pin_b = pin_b
self.a = PWM(Pin(pin_a, Pin.OUT), freq=freq, duty_u16=0)
self.b = PWM(Pin(pin_b, Pin.OUT), freq=freq, duty_u16=0)
self._running = False
#
# Basic operations
#
def coast(self):
# see the DRV8837 motor driver chip datasheet
self.a.duty_u16(0) # always low
self.b.duty_u16(0)
self._running = False
def brake(self):
# see the DRV8837 motor driver chip datasheet
self.a.duty_u16(65535) # always high
self.b.duty_u16(65535)
self._running = False
def stop(self, arg=None):
"""There are two ways to "stop", so uncomment the one that best fits
your situation."""
self.coast()
#self.brake()
if arg:
arg.deinit()
#
# Actual motions.
#
# speed - percentage 0..100. Negative values mean opposite direction.
# howlong - time in seconds (currently ignored)
#
def forward(self, speed, howlong=None):
speed_u16 = duty_to_u16(speed)
self.a.duty_u16(speed_u16)
self.b.duty_u16(0)
self._running = True
if howlong:
t = Timer(mode=Timer.ONE_SHOT, period=howlong, callback=self.stop)
def backward(self, speed, howlong=None):
speed_u16 = duty_to_u16(speed)
self.a.duty_u16(0)
self.b.duty_u16(speed_u16)
self._running = True
if howlong:
t = Timer(mode=Timer.ONE_SHOT, period=howlong, callback=self.stop)
def go(self, speed, howlong=None):
"""Move forward or backwards according to the sign of speed."""
if speed > 0:
self.forward(speed, howlong)
elif speed < 0:
self.backward(-speed, howlong)
elif speed == 0:
self.stop()
else:
print(f"ERROR: Unknown speed: {speed}")
def is_running(self):
return self._running
# Replace the PINX and PINY with the pin numbers that match the wiring as shown
# in the "Pins of the Car" section in the documentation.
m1 = motor(19, 18)
m2 = motor(20, 21)
m3 = motor(6, 7)
m4 = motor(8, 9)
def stop():
m1.stop()
m2.stop()
m3.stop()
m4.stop()
def coast():
m1.coast()
m2.coast()
m3.coast()
m4.coast()
def brake():
m1.brake()
m2.brake()
m3.brake()
m4.brake()
def go(speed, howlong=None):
m1.go(speed, howlong)
m2.go(speed, howlong)
m3.go(speed, howlong)
m4.go(speed, howlong)