Four− hours today and four− hours tomorrow, what is your plan?
1. Goals
-
Take a step back and map out the car actions you want to achieve.
-
Drivers for more car sensors.
2. More sensors
- New/updated versions are at
-
S: / COE / COEguest Shared / Robotics / Freenove 4WD / library-examples / day4
2.1. Sonar demo
-
sonar.pymodule -
test_sonar.pydemo
Chapter 3 Ultrasonic … from
docs / Freenove 4WD / Mecanum_wheels / Tutorial.pdf
What is happening at the hardware level and how does the sonar.py driver code do its thing?
-
Thonny [ Plot ] window demonstration with
test_sonar.py. -
Oscilloscope to show voltages vs. time.
2.2. Light intensity sensors
-
light.pymodule -
test_light.pydemo
Chapter 4 Light Tracing … from
docs / Freenove 4WD / Mecanum_wheels / Tutorial.pdf
2.3. IR Reflectance sensors
-
reflect.pymodule -
test_reflect.pydemo
Chapter 5 Line Tracking … from
docs / Freenove 4WD / Mecanum_wheels / Tutorial.pdf
===
4. Multiple tasks at the “same time”
async_blink.py 1
2
3
4
5
6
7
8
9
10
11
12
13
14
15
16
17
18
19
20
21
22
23
24
25
26
27
28
29
30
31
32
33
34
35
36
37
38
39
40
41
42
43
44
45
46
47
48
49
50
51
52
53
54
55
56
57
58
59
60
61
62
63
64
65
66
67
68
69
70
71
72
73
74
75
76
77
# Built-in modules
import asyncio
# MicroPython-specific modules
from machine import Pin
# Local custom modules
# Setup hardware configuration
onboard_led = Pin(25, Pin.OUT)
##############################################
#
# TASK
#
# Blink an LED with a certain period
# NOTE:
# - async in front of the function definition
# - sleeping is "await asyncio.sleep_ms(...)
#
async def blink(led, period_ms):
print("blink() started.")
# do this forever
while True:
# same as led.value(1), but nicer to read
led.on()
# A normal time.sleep(0.005) or time.sleep_ms(5) will also wait,
# but those hog the processor and don't allow it to do anything
# else besides do nothing very quickly.
#
# This version says "come back to me in 5ms, AND releases the CPU
# to do other things in the meantime.
await asyncio.sleep_ms(5)
led.off()
# Same idea: stop *this* function, but let other things take over
# until the time is up.
await asyncio.sleep_ms(period_ms)
print("blink() finished.")
# This async task *starts* two other tasks, for a total of 3
# "things" going at once. The "main()" task's role is simply to start
# the "real" work, after which its work is done.
async def main(led1, led2):
print("Starting tasks.")
task1 = asyncio.create_task(blink(led1, 700))
task2 = asyncio.create_task(blink(led2, 400))
# hold here for a while (how long?)
await asyncio.sleep_ms(10_000)
print("Stopping tasks.")
# then exits
# Above is all setup of variables and functions.
# Code that makes things happen begins now.
# Line below never finishes because blink() has a "while True:"
# (Control-C to stop, or click Stop)
asyncio.run(blink(onboard_led, 500))
print("After run(blink()).")
# Comment out the above lines so that the following line will run
# What does it do?
asyncio.run(main(onboard_led, onboard_led))
print("main() has finished.")
5. motor module
First, open up the motors demo code and read how it works:
-
S: / COE / COEguest Shared / Robotics / beetlebot / 2. Python Tutorials / 2.Python_Codes / Project_06_Motor_Drive_And_Speed_Regulation
(Take a minute to actually read that code.)
motors.py code 1
2
3
4
5
6
7
8
9
10
11
12
13
14
15
16
17
18
19
20
21
22
23
24
25
26
27
28
29
30
31
32
33
34
35
36
37
38
39
40
41
42
43
44
45
46
47
48
49
50
51
52
# MicroPython-specific modules
from machine import Pin
from machine import PWM
# Right wheel
pin1 = Pin(14, Pin.OUT)
pin2 = PWM(Pin(16))
pin2.freq(50)
# Left wheel
pin3 = Pin(15, Pin.OUT)
pin4 = PWM(Pin(17))
pin4.freq(50)
def forward():
pin1.value(0)
pin2.duty_u16(50_000)
pin3.value(0)
pin4.duty_u16(50_000)
def back():
pin1.value(1)
pin2.duty_u16(10_000)
pin3.value(1)
pin4.duty_u16(10_000)
def left():
pin1.value(0)
pin2.duty_u16(50_000)
pin3.value(1)
pin4.duty_u16(32_768)
def right():
pin1.value(1)
pin2.duty_u16(32_768)
pin3.value(0)
pin4.duty_u16(50_000)
def stop():
pin1.value(0)
pin2.duty_u16(0)
pin3.value(0)
pin4.duty_u16(0)
motors module 1
2
3
4
5
6
7
8
9
10
11
12
13
14
15
16
17
18
19
20
21
22
23
24
25
26
# Built-in modules
import time
# MicroPython-specific modules
from machine import Pin, PWM
# Custom modules
import motors
while True:
motors.forward()
time.sleep(2)
motors.back()
time.sleep(2)
motors.left()
time.sleep(2)
motors.right()
time.sleep(2)
motors.stop()
time.sleep(2)
6. Motors and Blinks
 1
 2
 3
 4
 5
 6
 7
 8
 9
10
11
12
13
14
15
16
17
18
19
20
21
22
23
24
25
26
27
28
29
30
31
32
33
34
35
36
37
38
39
40
41
42
43
44
45
46
47
48
49
50
51
52
53
54
55
56
57
58
59
60
61
62
63
64
65
66
67
68
69
70
71
72
73
74
75
76
77
78
79
80
81
82
83
84
85
86
87
88
89
90
91
92
93
94
95
96
97
98
99
# Built-in modules
import asyncio


# MicroPython-specific modules
from machine import Pin


# Local custom modules
import motors


# Setup hardware configuration
onboard_led = Pin(25, Pin.OUT)


##############################################
#
# TASK
#
# Blink an LED with a certain period
# NOTE:
#   - async in front of the function definition
#   - sleeping is "await asyncio.sleep_ms(...)
#
async def blink(led, period_ms):
    print("blink() started.")
    # do this forever
    while True:
        # same as led.value(1), but nicer to read
        led.on()

        # A normal time.sleep(0.005) or time.sleep_ms(5) will also wait,
        # but those hog the processor and don't allow it to do anything
        # else besides do nothing very quickly.
        #
        # This version says "come back to me in 5ms, AND releases the CPU
        # to do other things in the meantime.
        await asyncio.sleep_ms(5)

        led.off()

        # Same idea: stop *this* function, but let other things take over
        # until the time is up.
        await asyncio.sleep_ms(period_ms)

    print("blink() finished.")


##############################################
#
# TASK
#
# Drive a specifc path, repeatedly.
#
async def drive_path():
    while True:
        motors.forward()
        await asyncio.sleep(2)

        motors.back()
        await asyncio.sleep(2)

        motors.left()
        await asyncio.sleep(2)

        motors.right()
        await asyncio.sleep(2)

        motors.stop()
        await asyncio.sleep(2)


# This async task *starts* two other tasks, for a total of 3
# "things" going at once.  The "main()" task's role is simply to start
# the "real" work, after which its work is done.
async def main(led):
    print("Starting tasks.")
    task1 = asyncio.create_task(blink(led, 700))
    task2 = asyncio.create_task(drive_path())

    # hold here for a while (how long?)
    await asyncio.sleep_ms(30_000)
    print("Stopping tasks.")
    # then exits
    #
    # Can you make this go for *forever* ???


# Above is all setup of variables and functions.
# Code that makes things happen begins now.


# What does the following do?
asyncio.run(main(onboard_led))

print("main() has finished.")
7. Python down to the machine
First thing today![1]
7.1. Digital electronics
Semiconductors are not conductors and not insulators. Their electrical / mechanical (!) behavior can be changed by doping the material with impurities (n-type or p-type).
7.2. RP2040 chip
We start at the some of the lowest levels of what’s going on.
Raspberry Pi (the company) makes several products:
-
Full Linux-based single-board computers:
-
Raspberry Pi Zero 2 W
-
Raspberry Pi 3 Model B+
-
Raspberry Pi 4 Model B
-
Raspberry Pi 5
-
Raspberry Pi Compute Module 4
-
Raspberry Pi Compute Module 4S
-
Raspberry Pi Compute Module 3+
-
-
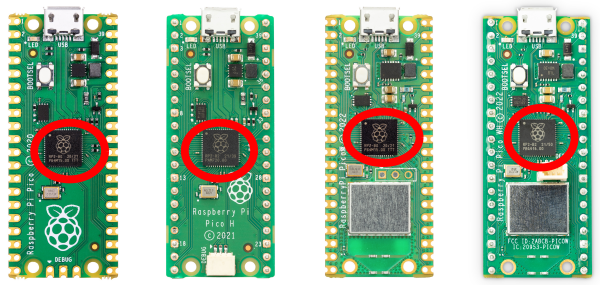
RP2040 microcontroller placed on boards called:
-
Raspberry Pi Pico
-
Raspberry Pi Pico W
-
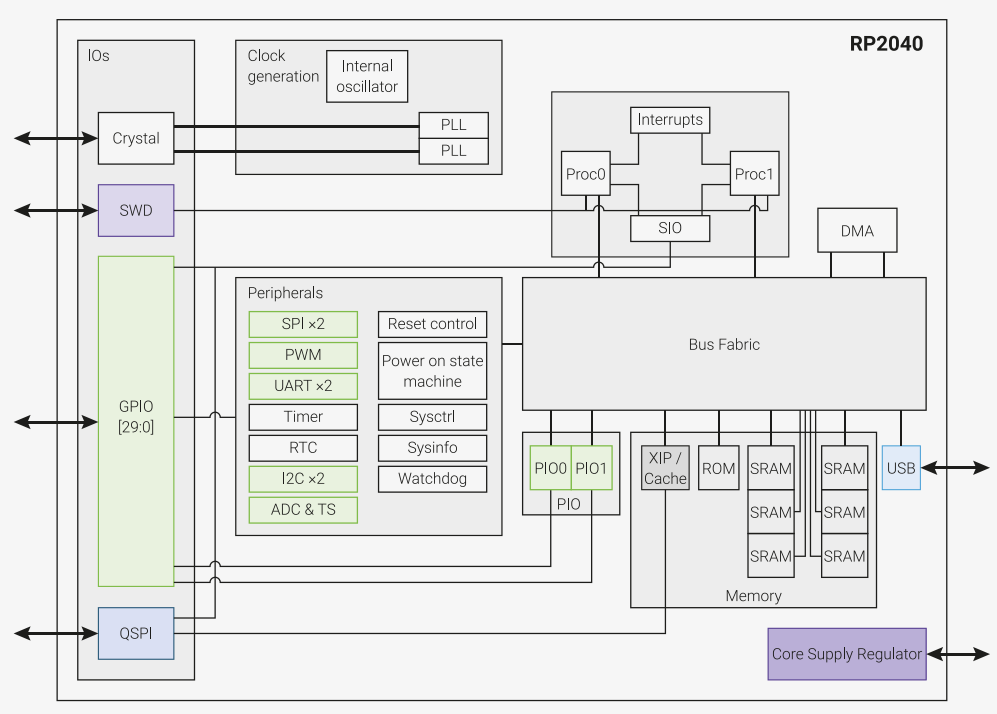
What is inside the RP2040?
-
CPU vs MCU vs "an Arduino" vs PC / Laptop / Phone
-
peripherals interact with the outside world
-
a CPU architecture: ARM Cortex-Mx, Intel x86, RISC-V, AMD, a hundred more for microcontrollers.
Going up the levels from digital electronics to Python:
-
Machine code
-
Assembly language
-
Higher-level languages
7.3. Python language
-
Compiled languages vs. interpreted
-
Compiled to machine code: C and C++. Arduino uses C++ with magic helpers.
-
Interpreted: Python, JavaScript, Ruby, Java
-
But the machine can only run machine code!
-
Python VM — virtual machine, runs bytecode. (this is how Python runs on your PC and on the Pi Pico without change)
-
Python → compiled to bytecode → bytecode runs on Virtual Machine
-
→ which runs on the RP2040’s processor → which executes its ARM Cortex-M0+ machine code instructions.
8. Touchscreen demo
Pi Pico Touchscreen display with buttons.
main.py 1
2
3
4
5
6
7
8
9
10
11
12
13
14
15
16
17
18
19
20
21
22
23
24
25
26
27
28
29
30
31
32
33
34
35
36
37
38
39
40
41
42
43
44
45
46
47
48
49
50
51
52
53
54
55
56
57
58
59
60
61
62
63
64
65
66
67
68
69
70
71
72
73
74
75
76
77
78
79
80
81
82
83
84
85
86
87
88
89
90
91
92
93
94
95
96
97
98
99
100
101
102
103
104
105
106
107
108
109
110
111
112
113
114
115
116
117
118
119
120
121
122
123
124
125
126
127
128
129
130
131
132
133
134
135
136
137
138
139
140
141
142
143
144
145
146
147
148
149
150
151
152
153
154
155
156
157
158
159
160
161
162
163
164
165
166
167
168
169
170
171
172
173
# built-in packages
from collections import namedtuple
from math import exp, pi
# MicroPython-specific packages
import utime
from machine import Pin
from machine import Timer
from machine import enable_irq, disable_irq
import micropython
micropython.alloc_emergency_exception_buf(100)
# Local packages
from LCD_3inch5 import LCD_3inch5
from loadcell import Loadcell
import gui
from gui import BarMeter
from gui import CenterBarMeter
from gui import Button
from gui import Point
# Load cell scale factor
LOADCELL_SCALE_N = 1
# bar meter
BAR_MIN = 0
BAR_MAX = 300
# deviation meter
DEVIATION_MIN = -20
DEVIATION_MAX = +20
# HX711 samples at 10 Hz
SAMPLE_RATE = 2
# FILTER_CUTOFF = 0.1
FILTER_CUTOFF = 0.1
TIME_CONSTANT = 1 - exp(-2 * pi * FILTER_CUTOFF / SAMPLE_RATE)
print(TIME_CONSTANT)
HX_OUT_PIN = Pin(27, Pin.IN, pull=Pin.PULL_DOWN)
HX_SCK_PIN = Pin(26, Pin.OUT)
_interrupt_state = None
def eint():
enable_irq(_interrupt_state)
def dint():
_interrupt_state = disable_irq()
scale = Loadcell(HX_SCK_PIN, HX_OUT_PIN, 128, TIME_CONSTANT)
# scale = LoadcellHX711(HX_SCK_PIN, HX_OUT_PIN, 128, TIME_CONSTANT)
scale.SCALE_N = LOADCELL_SCALE_N
scale.SCALE_N = float(2**16) / 300
scale.value = 150
#
# regularly sample the force sensor
#
sampler = Timer(mode=Timer.PERIODIC,
freq=SAMPLE_RATE,
callback=lambda t: scale.read())
def main():
LCD = LCD_3inch5()
LCD.bl_ctrl(100)
LCD.fill(gui.BLACK)
LCD.show_up()
METER_MAX = 300
reference = 150
bar = BarMeter(
LCD,
Point(0, 0),
width=320,
height=150,
label="Force (N)",
label_align='left',
draw_limits=True)
bar.value_min = BAR_MIN
bar.value_max = BAR_MAX
buttonSub = Button(
LCD,
Point(0, 150),
width=60,
height=240 - 150,
label="-5",
label_align='center')
deviation = CenterBarMeter(
LCD,
Point(60, 150),
width=320 - 60 - 60,
height=240 - 150,
label="",
label_align="left",
text_color=gui.RED,
draw_limits=True)
deviation.value_min = DEVIATION_MIN
deviation.value_max = DEVIATION_MAX
buttonAdd = Button(
LCD,
Point(320-60, 150),
width=60,
height=240 - 150,
label="+5",
label_align='center')
buttonTare = Button(
LCD,
Point(0, 0),
width=50,
height=40,
label="Tare",
label_align='center')
while True:
if val := scale.newtons:
bar.label = f"Force: {val:5.1f} N"
bar.draw(val, reference)
deviation.draw(val - reference)
tp = LCD.touch_get()
if tp is not None:
# swap
tp = Point(tp.y, tp.x)
x = 320 - int((tp.x - 430) * 320 / 3270)
y = int((tp.y - 430) * 240 / 3270)
tp = Point(x, y)
btn, edge = buttonSub.handle(tp)
if edge > 0:
reference -= 5
btn, edge = buttonAdd.handle(tp)
if edge > 0:
reference += 5
btn, edge = buttonTare.handle(tp)
if edge > 0:
scale.tare()
# print(f"hx_offset: {scale.OFFSET}")
deviation.label = f"{reference:5.1f}"
LCD.show_up()
utime.sleep(0.1)
if __name__ == "__main__":
main()