
Tutorial notes
The documentation for this kit is actually super good!
We will use this fact to help us build the original kit’s hardware and to test out the various modules directly. Thus you will learn a little about the hardware itself, how to interact with them via MicroPython, and get several examples of programming techniques in your fingers.
Begin at the docs' front page:
We will skip the step "2. Play Mode", going from "1. Assemble the car" to "3. Programming Mode". There will be other custom methods of controlling your car over the Internet that will be more useful when there are several in the same room.
1. Assemble the car
Use the YouTube video, along with the great fold-out instructions, to sequence your build of the car.
-
Get the battery charging as soon as you can. Connect the battery to control board and charge via the USB-C port.
-
Connect the motor wires to the control board, but wait to connect the other sensors. You will connect the others as you test them.
3. Programming Mode
3.1.1. Install Thonny
-
These instructions were created from Thonny version 4.1.1
-
Thonny is (probably) already installed on your PC, so you may be able to skip this step.
Check: Create desktop icon.
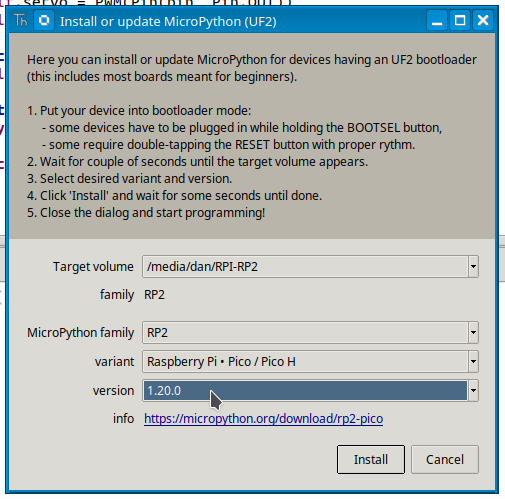
3.1.2. Install MicroPython on your Pico
It says optional, but you should practice this in preparation for your advanced work later this week.
The current version is 1.20.0
3.1.3. Upload the Libraries to Pico
Again, it says "optional", but now is the time to learn how to restore your system to its original state.
-
We have a shared folder with this code already downloaded:
S:\COE\COEguest Shared\Robotics
Step 5. says "Select these 3 files." … a typo!
Select all of the files in the /libs folder (should be 10 files total)
If you feel adventurous, then select all the files in the lower Raspberry Pi Pico window (the files on the Pico) and delete them. Then upload the files again to truly restore the code to the original state.
3.1.4. Run Script Online
A neat feature of MicroPython is that your microcontroller (Pi Pico, here) behaves like another disk drive from the perspective of the PC.
This means that you can edit the .py files directly on the device and save + run them, without that code existing on your USB-connected laptop/desktop.
This is good and bad!
If you do lots of edit-run-troubleshoot iterations, then you need to keep clearly in mind that the code is not backed up anywhere — it only exists on the Pi Pico. Guess what happens to your built-up knowledge and code when you reprogram the Pico? This pain is unfortunately common, until you get old and geezery enough to figure out personal habits for never losing code or data.
3.2. Learn Modules
3.2.1. Motor
Go ahead and plug the motor connectors to the appropriate jacks, if you’ve not already done so.
Place your car on some sort of small box so that when the motors+wheels start turning it doesn’t leap off the desk :)
Proceed to read the tutorial and do the things. Here is where you get to start making things happen.
You don’t need to do exactly everything in the Motor sections. The text and examples are there to:
-
Get you familiar with how the board and motors interact with each other.
-
Demonstrate several programming techniques that a) show good ways of doing things, and b) match how the provided code works.
Pay close attention to the hierarchy of:
-
The
machine.Pin()andmachine.PWM()commands -
The
motor.pymodule for encapsulating a bunch of tedious details and housekeeping into a few easy commands to make an individual motor do things. -
The
motors.pymodule (note thes) and how itimports themotormodule for its features, then wraps them into a group of 4 to handle the entire car’s locomotion capabilities.
Section 3.2.1.7. Smooth Speed Effect has to do with electronics and power supplies, and other analog things on the circuit board (my personal favorite).
| Ask for a demo of this if I forget! |
Consider this code snippet from the tutorial:
    flags = [True, True, True, True]
    while flags[0] or flags[1] or flags[2] or flags[3]:
	    # other stuff
A more pythonic way of this huge chain of or is to use any(things) (there is also an all(things)):
	flags = [True, True, True, True]
    while any(flags):
	    # other stuff
IMHO this is clearer to read.
Go ahead and make the change on your board’s motors.py file.
motors.py or in motor.py?
The motors.move('action', power) function now has 4 options for motion.
-
What are other possible ways the car would move with different motor settings?